Your boys are missing out on this!


Monster trucks? Markers? painter's Tape? and some paper.... Yes! I made art monster truck jam. It was a fun activity that my boys really enjoyed!

It's been in the works for awhile, I just needed some white paper on a roll, (butcher paper) I got mine from staples for about $10, The monster Trucks came from the Hot Wheel section at Target, and we had markers that I had bought during back to school season for like $.30

The prep:
Tape a good length of paper to the floor, I think our paper was about 3 feet long

Tape your kid's color choice of marker to a monster truck using painters tape, we found three trucks, so we used red, blue, and black. I loved using the pipsqueaks markers, they are shorter than regular markers, making it the perfect size for the monster truck, We also used regular markers, it's not a big deal to use either.

I used washable markers, so if the trucks did go off the paper it was an easy to clean up.


Afterward, use this paper as wrapping paper! or cut it up into shapes and use it as collage art!

My savings tip for this activity, buy extra school supplies late July, you will be glad you did, I always buy like 5-7 more packages or markers and crayons. They make some nice unexpected gifts, for example, your daughter was invited to 7 other girls birthday parties for this school year, (those presents can get really expensive,) pair some markers and crayons to a nice activity book, you have a perfect present for the birthday girl/boy!

Nicks Tenderloins and Blank Park Zoo visit recap

looking at the funny otters!


A perfect Saturday for this stay at home mom is when we are able to do something as a family in the morning, then for a late lunch/early supper, then we go out to eat. A couple Saturday on a nice late winter Saturday when the weather was just warm enough to stay outside for a couple hours we went to the Blank Park Zoo, It was a fun time, not too busy and not too hot! Those are the days I cherish during a long winter month!

at the Discover zone with the fish
Notice in the pictures that it was a perfect time to go to the zoo, (not too many people) and that is part of the reason why I love having a membership, you can go to the zoo on a whim and if it's too busy you come back when it's not as busy and spend more time at each exhibit! (I suppose it a dirty little secret my kids haven't quite got onto yet!)

On a side note, during the spring and summer absolutely love going to the HY-Vee down the road and get sushi for me, and Lunchables for my kids so we can have lunch at the park in the Zoo's parking lot, they kids love it, there is a shelter with tables, and lots of shade, the sounds of the birds and the tall grass and my kids playing makes this a perfect spot to chill, and eat some sushi!


This particular day we had a wonderful time at the zoo, and then we wanted to try a new restaurant, It's a little-known secret that in Iowa there is a place that has the best tenderloins in the nation, and that is right here in Des Moines but more particular it's on the South Side of the Des Moines Area. Watch out Smitty's Tenderloin, a new kid's in town and the Tenderloin is thick and perfect made my Nicks Town House Tenderloins! 
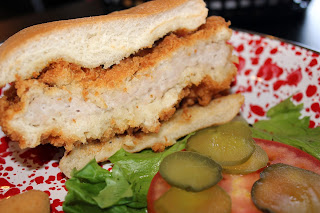
The king tenderloin is about 2 inches thick, biger than a bun!

With the perfect crunchy outside and moist tender pork when you bite into the King tenderloin it's delectable! No wonder Iowa Pork producers voted the King Tenderloin the best tenderloin in Iowa (nation) because we (Iowa) are known for the best tenderloins in the nation. Thanks to the Pork Producers for that, enough stories and people have shared that when they land in the Des Moines area the first stop they make is down the road to a tenderloin shop for a perfect meal they have been waiting for.

This was our fist time stopping into Nick's What big shoes to fill when you open a tenderloin shop on the south side of Des Moines, It's gotta be good, there are enough places to choose from that you will need a killer tenderloin. And they did just that!

The King Tenderloin which my husband and I split was the perfect portion, most of the time we order one for each of us, so we could have leftovers, next time we will be doing that.  our kids had kid-friendly food from their kid menu, corndog nuggets.

The atmosphere was fun and kid friendly, you walk in and there is a bar, and the hostess greeting you, I felt like Nick's was more like a diner feel than a pub, which I am grateful for (Nicks bought the old Tavern on the south side.)

Thank you, Nicks, for having such a great kid-friendly restaurant that is close to the zoo so families can enjoy an Iowa favorite, and relax after a couple amusing hours at the zoo. We will be back often!


The rope bridge at the Discovery Zone at the BPZ
My quick tip for kids and families that go to the Blank Park Zoo, go to the discovery center when it's cold or too hot, it's air conditioned and heated during those days you need a break. The Zoo is open year round and the Discovery center is perfect for winter days. Eat before you go to the zoo, they don't let you bring lunch into the zoo.

To find out why I love my Zoo pass go to this blog post


My top classes to take with BOGO Craftsy SALE!


Craftsy has a Buy One class get one Free, and there are some really good ones to take if you are looking to learn a new skill!

GO HERE for the last post on what classes I would pair up! there are some really good ones you might not want to miss, including watercolor cards, watercolor as an art, yummy and healthy FOOD, and CARD and STAMPING classes that I learned so much from! 

Go here for the Bagel class that I love!


My recent class I took was the Bagels and Pretzel class, totally worth it! the bagels I made were so inexpensive, and you didn't need any extra equipment! I figured for one batch of bagels (8-4oz bagels) cost only $1.50 in ingredients! totally worth it if you like to bake and save money like this girl does! (so totally worth the money to take this class!

My quick tip for saving money with Craftsy is: to buy classes when they are on sale, sometimes you can get a class for $10, but my favorite time to get classes is their BOGO event, because you get to choose what you want, and usually the classes are about $20, so you could get two classes for $20, It's totally worth it! The Craftsy community is awesome, I have learned so much from other students that I just really love being a part of the community! If you are part of the Craftsy community please feel free to follow me! 


Craftsy


Penny Black Peony's watercolor stamp


Watercolor Stamping is very addictive! I love this stamp for all the simple reasons why I love watercolor, The art of it! each time I stamped and watercolored the stamp I got something unique every time. If you love to stamp but want a unique look to your cards this stamp set is the one. 

I found this stamp set at my local paper crafting store at Memory Bounds in Ankeny Iowa. I could have waited for a sale but it was calling my name and I had to have the stamp. 

Penny Black has a great line that works really well with "no line" stamping, and the Peony stamp didn't disappoint. 

I used Gansia Tambi light pink and Olive green for the flower, and then for the background, I used Cobalt Blue. I then used some Starry Colors that I mixed into the pink to make the watercolor shimmer.
  
Here's how I did it:
stamp your flower with some water activated ink (I used Tim Holtz worn lipstick and Pealed Paint) You want some ink that will work with the color of the Gansia Tambi watercolor that you will be using. 
then I mixed some Gansia Tambi light pink and Olive green with some starry color for the flower and stem. (I used more starry color than pigment at this point, and lots of water.) the ratio would be 80% water, 4% pigment and 6% Starry color  (Yellow Gold) The idea is to have the brush loaded with water, then with the paint mixture. I used a size 4 round brush for the painting of the stamped image.
To paint I would paint the peony as if I was painting it without the stamp, so I started in the middle and worked out. each pedal I would work from the darkest and then work out to the lighter part. I did this until the whole stamped looked like I painted it.  The key to this is to always have your brush full of the water pigment mixture. 

For the background, I used a wet on wet technique, and just added the cobalt blue water color to just the edge of the flower and worked out with just water to give it a dreamy look. 

I then stamped with Tim Holtz Peeled Paint a Thank you sentiment. mounted it onto a card base. This stamp works well horizontal as well as vertical.


To learn more about watercolor cards take an Online Class with Angela Fehr, (who inspired this card.) Here is a 20% off coupon for the class. Totally worth the time and money!

If you are looking for a good watercolor card class, Craftsy has one that I love and recommend 
Go here for the class from Craftsy that will show you how to do this technique


If you are looking to just learn about watercolor I would head over to CreativeBug and look into Yao Cheng's beginner watercolor class, You will love her class!


Some links are affiliated with my blog, by purchasing from my links you are supporting my blog

Watercolor poppies are the Spring Card of 2017


I LOVE PAINTING and STAMPING flowers cards, so When these poppies from Stampendous came out I had to have them.  I came across them at my local paper craft store at Memory Bounds and snatched them... I started early in the morning to stamp they ( I made about 10 cards) turned out amazing!

The fun was in the creating, and decision making, do I want to do a resist embossing or just a watercolor, or maybe I wanted to layer the flowers? What I absolutely loved about all the different ways to create with this stamp set was that it came with a stencil so I used the stencil as a mask to get some really neat effects! (coming later in a different post.)

Then after the stamping session the next morning I watercolored the cards, I used a small percent of pigment from my Gansai Tambi and Stary colors to color the flowers,

For the watercolor I mixed the starry color White gold in with the Gansai Tambi cobalt watercolor with lots of water, I wanted a light and dreamy feel to the flower. on the background, I also just painted the white gold for some added shimmer.

then I assembled the card with a bit of pop dots, this card turned into one of my favorite cards that I had given to a wife that has her husband in a hospital.


at the bottom I made a happy mistake and used some Washi Tape, I love how the washi tape anchored my card to make such a stunning finishing touched! (washi tape was found at Michaels in the best value recollection washi tape tube.)

On a side note about this stamp set, it came with a stencil for masking, I fussy cut the flowers and leaves out.


My quick Desing tip: I like to use Washi Tape that adds a design Element to the beauty of the card. I knew I didn't want floral WT. I wanted something that complements the card.
  To compliment a floral design add a geometric pattern.

If you are looking to add some watercolor to your card making I would suggest taking this class at Craftsy or Yao Chang's class at Creativebug, both are excellent recourses to help with your watercolor.

Here is a review for the watercolor card class from Craftsy I posted a little bit ago.


Some links contain affiliate links, when you make a purchase through one of these links you are supporting me and my blog.

6 ways to feel peaceful in any situations

 Got Chaos? I have some small and simple ways that I have personally felt peace on a daily basis. These ideas can really help ground you and help you feel more freedom from earth's care. The experiences I have shared has also helped my artist come out to play and create.


Walk by yourself. Walking helps the brain digest stress, I love my walks. I am happier for it. All I need is a good 30-minute walk,.  I get to walk around a pond every morning, or if it's one of those days that I need to get "lost" in my thoughts the trail by my house is a great one to escape into my thoughts. 
A clean house helps bring peace and happiness. I "shine" my sink almost daily it brings me peace.

Cleaning your living area. I strongly believe that a clean house is conducive to a more peaceful life. I hate cleaning but I can feel more peace once my house is organized. With that said I balance organized chaos and a clutter free house very well. Also if you are a creature of habit or routine, staying on a cleaning routine helps a ton, and it's in those times that I can feel peace.

Letting go of control. For me there was nothing more important than letting go of that control, I felt free and almost like my soul was going to burst with goodness. What do I mean by control? It could mean that you came to your aha moment about that life isn't about you (it's about your kids.)

I tell myself, not my circus, not my monkeys I try really hard to not let others bother me, including what they are doing or are not doing. Which then leads me too...

Let your people help you: Yes we all want to be self-sufficient. and not "need" any help, I am talking about your family members. Let your husband help load the dishwasher, fold the clothes. We can't and shouldn't be able to do it alone. If you need help ask! You are cultivating a relationship with each and every family member, let them feel like they are part of your loving and caring family, even when they give you that laser soul crushing stare.  

Change your environment. Your environment plays a huge part of what and how you feel. I like an analogy about a fish tank, there is a crucial ph level that all fish need to have, if you go over or under that ph level they can not thrive. Same thing with us, there is a level of tolerance that we can thrive in. Is our environment something that we can thrive in. If not change it.


DO SOMETHING FOR YOURSELF I am a huge advocate for mental health. I know that if we don't take care of ourselves we are more likely to get in a funk, or even worse get into a depression. I know I sound dramatic, and maybe it is, but doing something small for yourself isn't being selfish.
captain's living quarters during the Civil War

I like to think about this analogy: When there is a war, the leadership: (captains) have a better living quarters than the soldiers, why? because they need that space to think, make the right decisions, how can they when they didn't have a good night's sleep, and not taking care of themselves.  We need to do that for ourselves. I believe it's not being selfish it's having foresight for what's to come.  For me personally, I need a good 3 hours of creative time a day to feel peace and calmness in my life. Those three hours are my time to help me be the best mother I can be. I get that time in the morning before school, and after bedtime.  


Do you have anything that brings you peace with a house full of children? I would love to know your secrets and ideas!

Happy creating a peaceful self! 

2 step easy Sous Vide Soup You are missing out on

I love 2 step recipes, you know, the ones that you have like two things you have to remember to do to make a great dish This is one of those! This soup you can adapt to other vegetables (broccoli,) but for us we had some cauliflower that I needed to use up.


Sous Vide Cheesy Cauliflower Soup


In a Ziplock gallon size bag add:
2 lbs of Cauliflower cut into small pieces, I used two bags of frozen cauliflower
1 fresh apple peeled and diced
2 cloves of garlic (if you like garlic use more, it was a very mild taste)
1tsp. salt
1/2 tsp Chili seasoning (more if you like it spicy, but don't add more than 1Tbs)
1-2 bay leafs
Sous Vide this at 183F for an hour

Then in a food processor or blender puree the soup, if you have an immersion blender use it like you would with a regular soup recipe.

Add the puree to a stock pot, add  48oz. of Chicken Broth (less if you want it thicker.) Bring to a boil, and simmer until you are ready to serve. before you start to serve it add 1 cup of cheddar cheese. When you serve the soup, add some cheese for a garnish, and some crackers! we like goldfish crackers!

Enjoy!

Why I haven't bought face moisturizer for two years!


I have the best face moisturizer! it's my favorite, you can't beat it, and it's not that expensive to make....

This is my amazing face moisturizer recipe I have made. You can thank me later!
I would not double the recipe unless you use a double boiler,  and you plan on giving it away, the shelf life is for about 3 months, and a little goes a long way! I always seem to run out of one batch three months later. So if you double give it away. You can also melt the ingredients in a microwave, I would do 1 min. intervals.

Best Ever Face moisturizer
3 Tablespoons of Shea Butter
1 teaspoon of shaved or pellet size beeswax
1.5 Tablespoons of Aloe Gel, I like the clear gel
1 teaspoon of a carrier oil, I use coconut or grapeseed oil

+ EO's that you like, I use Frankincense 10-15 drops, lemon 10 drops, and lavender 10 drops in mine, but use what you have, I have been known to do just put lemon and lavender in the moisturizer.

Melt the shea butter and the beeswax until it's all the way melted. I use a melting pot from Ranger, but you could use a double boiler or a microwave for this.
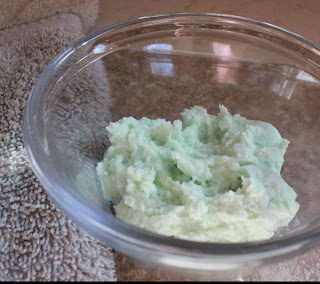
Then once that is all melted, I add the aloe gel and the carrier oil, let that all melt together then I pour the moisturizer into a glass jar with a lid and add your oils, and mix that up.

Let it stand for a day or so, it needs time to rest, I don't know why but waiting a day makes it better.

And that my friend is how you make face moisturizer, remember if you go outside add some sun block to your face, I like SPF 30 for my face!
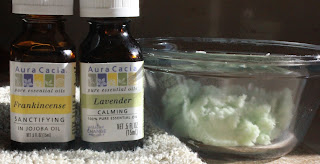
To break down the price, you might laugh, but here it goes


$12.97
$14.17
$9.38

Grand total for the base of this amazing moisturizer is $36.52 without Eo's

The math of the breakdown:
you use 1.5 oz of shea butter per batch, so there are 10 batches of shea butter for one jar! so for $3.65 plus whatever EO's you use, it's very cost effective! and that my friend is why I don't buy face moisturizer.

Dont' you just love when you can make something you use all the time for cheaper than you can buy at the cosmetic counter?  I mean you know what you put in it, you can customize the scent to whatever you dream up, (I have made a night time one and a daytime one with different scents.)

I have been making this for over 2 years now, and I still have half the jar of Shea butter, and a lot of beeswax left. Use what EO's and carrier oils you have on hand you will love this!


the Pharmacist wife is coming out, here is the why I use the bulk ingredients:

Shea Butter Benefits: Moisturizing: The concentration of natural vitamins and fatty acids in shea butter makes it incredibly nourishing and moisturizing for the skin. 

Aloe vera contains something called proteolytic enzymes which repair dead skin cells. It's a natural anti-age agent, it feels amazing on your skin, especially in the winter when your face is windburn or sunburn. 

Beeswax carries antiviral, anti-inflammatory, and antibacterial properties that are essential in fighting chapped skin and bacterial infections that tend to affect us most in the dry, winter months. It forms a protective wall by sealing in moisture in our skin without smothering and clogging up the pores


DIY PK Smores


This is a super easy recipe that most Preschool children can do on their own with little help from a grownup!

DIY PK Smores (I can't believe I haven' thought of this before now.)

Yup my active and spunky pk son wanted a snack,  so I said look in the PBS Do It Myself Cook Book and find something you want to eat. He's not a huge fruit or Veggie fan so... he saw the only not so healthy recipe (go figure right?) I was secretly hoping for the veggie wrap snack... SMORES it is!

I love recipes that are kid proof. This one is.

DIY PK SMORES
you will need:

Chocolate frosting
Marshmallow cream
and graham crackers
 a teaspoon and a butter knife to spread and a cutting board for easy cleanup


I let him use our teaspoon cookie scoop to measure out the frosting and marshmallow cream. We broke the graham cracker in half and put one tbs. of chocolate frosting on one side, and the marshmallow cream on the other side, then we put them together. A PERFECT SNACK for a PK to do it all by himself! It helped that the whole family ate them as soon as it was made!


The best toy for the whole family you didn't know about

What do you do with your kids during spring break????


 Buy them some JIX!


JIX and Hawkeye colored straws to make life fun
I had the opportunity to talk to the maker of JIX this week! His education toy JIX is amazing. He was able to help me see his vision for this educational toy. It's really a fun intuitive activity that helps cultivate team work, and learning together.

There are not too many toys out on the market that can involve the whole family, JIX is one of them. Get some JIX and let your kids play with these during spring break you will be glad you did! You may even find yourself playing with them too.


To learn more about JIX go here and here
 JIX can be used as a fun educational toy that inspire creativity and give children an opportunity to develop their motor and spatial skills through hands-on play.


Just how fun it is to use JIX? Um you had me at creating with straws, it's the little things right?

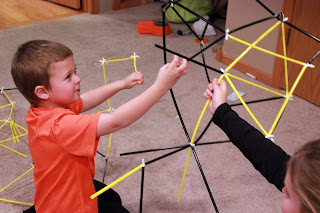
All you need is some standard drinking straws and JIX straw connectors. It's that easy, with them you can created shapes that turn into geometric patterns and 3d objects. It's really fun to see how triangles and pentagons can make a sphere, or triangles and hexagons can make a tube. It's perfect for science, math, art, using acute and obtuse angles, there are no limits to what you can make!


I love that this  is all about team building! 

The sphere is one of the most easiest and most awe inspiring project to do with your pk child. 

JIX won NYC 2014 Design Award for innovative and creative design.

Get your JIX on and let me see some pictures! it may help your kids learn and have fun. Other things Jix teaches your children, is volume, and Engineering. It really is the real STEM education toy.

This post contains affiliate links, by clicking on this link you are supporting me and my blog. 


18 Artists dates to inspire and make you happier

I mentioned in my earlier posts by taking care of yourself you can feel more peace. Here are some of my ways that have helped me become a more secure and happier person:

My pal Julia Cameron over at the Artists way and I call them Artists dates. to give you a brief explanation of artists dates: You and your inner artist's brainchild go out on a date weekly. Alone if possible, if not then take your kids along with you or sometimes you can take your Dear Husband with. It's a tool to help you to become an amazing mother, artist, spouse, friend, you name it, it will transform you!

Some of my favorite artist's dates I have shown lots of resistance too like I am too old for this or that's not for me right now... those have been my favorite ones:

Wave pool, just being in the sun energized me to make a series of paintings with just blue hues

Making cupcakes for NO REASON! (that was awesome I gave the cupcakes away to my daughter's 2nd grader's teachers, they LOVED THEM!) and here is another one that I posted about

Dancing with our disco lights at home to retro Disney soundtracks!

Watching an inspiring movie about other artist's I really like Walt Before Mickey. It was the best!

Look through magazines and cutting out whatever made me go OOH, I like that and making a poster of that and putting it on a poster board and then hanging it up for you to see all the time for a week!

Here are some of my dates with myself.

Going for a sunrise walk on a trail (one of my favorite)

Listening to a classical album and driving in the country

Planting tulips in the fall for a beautiful surprise in the spring

Taking a cooking class, and cooking the new recipes. Craftsy has a bunch of them, they always have one sale

Thrift store shopping (give yourself a 5$ or so limit.)

Making something that isn't in a fine art form  like at Creativebug like paper flowers
Fall in love with creativity at Creativebug I also love Lisa Congdon, she is pretty awesome!

FriendsDay, a whole day or afternoon where you and your BFF can just talk! those are my favorite!

I also have a running list of things I would like to do if I had a sitter (grandma) on hand on the weekends or in the evening.

Temple/Church worship (with husband is nice too)
visit a local farmers market (can't wait till spring)
visit the rose garden by the art center in the summer
Canning something (jelly and pizza sauce are my favorite, I do this with kids too, but it's fun by yourself.)
Sightsee and take pictures

A trip to the dollar store with a $5 budget to spend on just you... I like stickers and a helium balloon! Then I visit the scrapbooking store that is in town and get my eye candy fix.

A great example of how Artists dates can change your life came from a scheduled artists date about a year ago:

My love for paper flowers came from an artist date, I thought what if, I used my cameo to use up some of this horrible paper someone gave me and made it look like a flower? It worked and now I love them and hope that someday it can become a way to make some fun money.

My experience with artists dates have made me see the goodness in the world again and gave me proof that God really does want us to be happy!


I love them so much that I am in the works of posting An Artists date with kids post to come soon!


Colorful fun for your winter blahs


I remember taking a workshop that was all about sensory play, and that is where my love for tactile play comes in, I love playing with my kids in the sensory table! So I have a fun, colorful idea for you!


Say it with me: WATER BEADS! Yes! They are so much fun, that water beads are rated as a #1 best seller for kids toys on Amazon... if you haven't tried these you are missing out on some really fun times with your kids.

For a tub of water beads I put in about half of the bag, so 4 oz.

For $3.50, I have something that will entertain all my kids from 2-yrs through 8-yrs old! I add bowls, kitchen utensils, and sometimes plastic animals or tractors to the sensory bin and let them play! they have fun, and it makes me smile when I hear their giggles!


From the Manufacturer:

WHAT TO DO WITH WATER BEADS

1. Sensory Water Beads

Sensory play is what water beads are best at. Kids of all ages love the feel and look of them. They are so enticing! Colorful, smooth, squishy, cool… Really, there’s not much more you need to do with water beads than have a bowl full of them to plunge your hands into and hold and squish them.
Water beads seem like magic to kids because the beads start out so tiny and grow within a few hours. Just watching the beads change is a fun activity for younger kids. 
Related Posts Plugin for WordPress, Blogger...