Craftsy free Beinge watch day is Labor day

On Labor Day, enjoy 1,200+ Craftsy classes for free - for one day only. 

Click here for all the information

All you have to do is to get a login (be a member that is free)  to view any class on Craftsy for FREE! This is such a great deal, I am so glad I am able to carve out some time to watch a couple classes. You really don't want to miss this!

Here are some of my class reviews.

My tip on how to make the most of this day would be to add classes that you want to watch on your wish list before Labor Day, so  Monday comes you know what you want to watch! I can't decide between food classes, paper craft classes, or painting!

Here are some of my favorite classes if you are curious what classes I have taken from Craftsy:

Pair ups
Class reviews
My favorite class in food
Favorite class in watercolor
Favorite class in card making

Some of the classes that I hope to watch that I am so excited for are


Radiant Stamping because I love love love stamping with my Misti!


Silhouette Savvy: Design, Cut, Create with Paige Evans  Becuase I love my Silhouette and I am always wanting to learn more!


Cracking the Egg: 25 Ways to Transform Your Cooking with Chef Kyle Shankman Because my family loves eggs!


Jacques Torres' Ultimate Box of Chocolates Becuasea I love Chocolate and am always looking for ways to make a sweet gift for Teachers, family, friends and as thank you gifts


Venture into Vinyl, because a good friend of mine loves using her Silhouette to cut vinyl, and I want to try! 

Adventureland day trip tips

Summer is almost over! I can't believe it, and I thought I would share how I use my Adventureland pass this summer!

For the past4 consecutive years of owning a season pass for the whole family, I feel like I have a pretty good handle on how to make a day trip to Adventure land worth your time.


Kids and Adventureland go together very well, Adventureland does a great job of keeping the park clean, the kids happy and most of all entertained.

you know those days that you love, that live in your memory for the whole year, until next time you can have the same experience? yup those happen in June for our family Here is what I like to do:

We love to go on a Tuesday, Wednesday or Thursday to the park. We start the day with our regular morning routine, then head to the park at opening. I like to get into the parking lot about 10 minutes before the gates open (9:50.) That's in a perfect world, usually, we are good if we get there sometime before 11!

From the main gates, the train ride, and the carousel are next. Depending on how busy it is we go towards the left where all the rides are, not down main street. and do all those rides first. However there is NO SHADE or very little shade, so if it's hot we by pass this group of rides.

Here are some of my quick tips:

If it's raining there is the arcade that is actually really reasonable, we love the air hockey game, for .50 cents it's worth waiting out the rain, also the G-Force is in the arcade, and it's one of my kids favorite rides, and no it doesn't cost anything to ride it.

There is enough variety of rides that my children never feel like they are waiting on a sibling, Adventureland laid their rides out perfectly, for example, my older kids can ride the bumper cars while my youngest ride the trucks, I have eyes on both of them.

I consider Adventureland a two-day thing: one trip just rides, in June usually. The other trip is spent at the water park lots of time spent there in July.

I LOVE THE WATER PARK, yes it does take you about 20 minutes from the time you park your car to the time you walk across the park to get to the waterpark. Here is my view on this: Yes I would love for season pass holders to have access to parking by the water park, until that day happens, I am happy that I am getting my steps in for the day, and I make it fun, by walking by our favorite rides, and saying yes you can ride that 1 ride, on the way to the waterpark that is your favorite ride aka tilt-a-whril.

AdventureBay has a big sandpit for kids, it's awesome to play in!
Water Park Prep: I don't mind the changing rooms at AdventureBay, but there are only two spots for family restrooms, we Change at home, wear our swimming suits to the park, with a simple change of clothes for the way back. We are usually dressed in our swimming suits, and a cover up, I like wearing shorts and a shirt, and just bring underwear to change into- keeping it simple and real!

I am not a huge fan of bringing tons of stuff into the park, So that means on a water park day I bring a towel for all of us to use, it's usually one that I don't love, so then when we are done drying off I donate the towel to the Animal Rescue league bin by the gift shop. It's a win for everyone!

Lazy River and sandpit
I also love the Sand Bar/pit, but I always forget to bring sand box toys, so we usually cover up our legs in the sand and then wash the sand off and then get into the lazy river that we all love to swim in, my Kindergartener can swim in it with out floaties.

The clear tubes you can rent and they can be used in the lazy river and the wave pool, both of which are really fun and relaxing. Season pass holders can rent them free with a $5 deposit that you get back when you return the tubes.


Water park nerves: I have three kids, that all want to do something different at the waterpark, I have the safety on my mind and it's not a break for me when it's just me and my 8yr, 5yr, and 3yr old. We stick mostly to the pirate pool, and the wave pool. Then if my kids are awesome like they are, I let the older kids play in the Kokomo Cove play area, and watch them as close as I can while the youngest and I play at the splash pad. I love the waterpark for this reason: there are always life guards on duty, and if you tell the life guard your situation, and it's not crazy busy (weekdays) they will be another set of eyes for you when you can't always watch them like a hawk.


I am not a park foodie, I don't mind the food, but if I am trying to feed my whole family I am usually the one to suggest Culvers across the street from Adventureland, Otherwise, I pack a lunch or better yet we leave the park when everyone gets hungry,

The Main Street Cafe gives pass holders a 10% discount on food, so I like to fill up our drinks there, hey every little bit helps to save some money.


Things you may not have realized
Parking is $10. If you have a season pass it's free. 
Adventureland has the longest running magic show in the nation, Way to go Ben Ulin! and it's worth seeing, my kids love it and he is quite humorous for the adults as well.

Want a Season pass for next summer? Adventureland usually puts the season passes on sale in December (Christmas presents from Grandma.) So look for that on their website in December. usually, they are about $30 off the regular price.


No Mess Summer Sun Catcher


Start with a piece about 5x7 of clear contact paper taped sticky side up on the table top

Add a die cut and then some  colorful tissue paper I cut mine to about 1" squares 


Trim the paper around the contact paper


Tape the sun catcher to a window with some clear tape. 

This is always a fun way to bring smiles to everyone, I like making them for Fall too! I used a Silhouette to cut out the butterfly, I also like to do this with every season, it's always a fun time with my kids and my house is colorful!


Distress Crayons and Gesso


 Gesso and Distress crayons

To prepare this card, take your favorite stencil, I used a stencil I made with my Silhouette using a background cut file and some heavy craft paper, but any stencil would work well for this card and gesso.

Lay the card down with the stencil and apply gesso with a pallet knife to the stencil as if you were frosting a cake. Let it dry for at least 4 hours.

Then add 3-4 colors of distress crayons over the gessoed panel. With a baby wipe blend the colors together until you get the blending to where you would like, remember that gesso will act as a resist, so the more you rub on the gesso part, the less pigment will be left. The paper will keep the pigment rich, so you can really get some neat blending!


Then assemble the card with your embelishments and sentiments, easy peasy!

Desing Tip: To make some easy cards I like to stamp or print the sentiment on cardstock and then cut a strip of paper to work with the stencil graphic so the whole card will marry nicely together.

To find out other ways to use this technique below is a great YouTube Tutorial


To find out other great ideas on how to use water-soluble inks to use as watercolor check out 


How to learn more If you are like me and always love to learn more about watercolor cards there are two classes that I recommend you take:
Angela Fehr's Creative Watercolor class: This is a great class for anyone that wants to add watercolor to cards, art journaling, and Calligraphers.  This link will get you 20% off the class I am in the works of making a review for this class, I highly recommend this class, it is a great class! Here is the Class Review post


Watercolor Card's Made Simple on Craftsy. This is the perfect class for all paper crafters you can see my class review here

Happy Creating!


I use Affiliated links to help support my blog.

Whats for dinner? Menu planning is worth the time!!

Summer is always a great time to just eat whatever for supper and not worry about the timing issues. When school starts up (which I dread for lots of reasons) you are a slave to a schedule, that is if you are me it is... Bedtime is like a ticking time bomb at our house... I need to know what we are having for supper that morning or the whole evening goes downhill fast.

With Menue Planning,  When I am able to plan a good week or dare I say a month of good meals that are family-friendly usually we save more money and my time is spent better in ways that can enrich my life.

Where do I Begin?

I like two methods: 1 start where you are, and give your self permission to be flexible.
why am I meal planning?  and What is my goal?

How to implement the Why you are menu planning:

1. How am I going to remember the meals that I have planned out?

2. How am I going to implement meal planning and follow through?

3. Do I like prep work, Or how much of a cook do I want to be? 

4. How much time do I have to get dinner on the table each day?

These 4 questions are so important for a good menu, once you know those answers to these 4 questions, then you can start menu planning.

I have two ways that work the best for my family,


Option 1 (great for procrastinators)


Menu plan week to week

build your menu around what is on sale.

Use the sales and adds that are current for this week when you go grocery shopping to help you buy meat, produce dairy, and perishable items that are on sale from your local grocery store.

 For example, if Chicken is on sale I will have at least 3 meals of chicken that week. I will sometimes roast two chickens so I have one to eat for supper and the other chicken to shred for quesadillas. I will also decide what to do for lunches and breakfast, but I don't worry too much about those meals because cereal and muffins are not that hard to plan for. I really love this blog for all their amazing easy recipes

When planning for a week of dinners, I write it down on a post-it note and have it in the fridge for the week, that way it's an easy reminder. I will often make one trip to the store the day after the add hits, so I have time to see what's on sale and what I need for the week. super simple, and my go-to when I don't have a plan like Option 2.

Get this free template here


Option 2 (great if you have a plan and a trying to stockpile good deals on groceries.) 


Monthly menu planning is fun... (I can't lie, I have to tell myself this because if I don't I won't get my monthly menu plan going.)

You will want a good foundation to start with if you have a freezer, and storage space this may be the way to go.

For a month of dinners, I use a cheap calendar. (you know the ones that you get in the mail, or are at the dollar store.) Or I print them like this one from simply unscripted

I start by labeling each day of the week a category for dinner: Monday-Pizza, Tuesday-Mexican, Wednesday-Italian,  Thursday-Meatless, Friday- Grill, Saturday-Comfort food, Sunday- quick and easy.  These categories make it easy to plan each day of the week instead of saying hmm... what should we have on this Tuesday, also My family likes knowing that it's Friday pizza night! Wha Who! It makes your life easier having a label for each day of the week. That is why you are only going to have some type of spaghetti once or twice a night in a month... and so on. does your family get tired of spaghetti too because you make it too often?

 Then I plug in what I think my family will eat, and then make notes for when I need to go the store for an item. it's really that simple!


Tips for doing a Monthly meal plan


When I first started I spent a good hour looking through my cook book, or Pinterest to see what sounds good for supper, I still do but more as a free time thing than for meal planning.  So give yourself a good hour to plan, make yourself a good snack, and plan during a quiet time when you can focus and not be interrupted. I have even prayed to my father in heaven to help me plan, and those months always seem to go smoother.

Some of my great meals are the ones that I can make from memory, like a chili dinner, or a pork chop dinner, and casseroles. I like to keep things simple.
I use a menu planning software called Cook'n, I like it, but I usually find that a cheap calendar works just as well, especially if you are not "a cook that has to have a recipe" and just wants to have supper on the table.

Stock up on items you use often when they are on sale, this helps save a lot when menu planning, I know that I can use Pasta Sauce in lots of other ways than just pasta sauce. so.... I have about 30 jars stored because I got them on sale for half the cost. I like to stock up on about 25-50 items per year so about 1 item per week that I know will last for at least 6 months.

My favorite way to meal plan is to always have a couple oops meals, you know the nights when your not feeling like cooking, or getting dinner on the table, that is when I have frozen pizza or everything I need to make a soup, or a salad, or even mac and cheese for the kiddos. Those meals come in handy, but don't make it a crutch!

If you like to cook, use your kitchen tools, that will also help with knowing what you want to cook and what you have time for... don't underestimate the power of your mixer and food processor!

Here is a link that I thought was also helpful and full of great advice!


If you are wanting a good footing on how menu planning works, MomsByHeart.Net has some amazing blog posts.


I would love to learn how you get supper on the table, are you the family where you are like- let's go out every night and now you need to "figure it out" been there-done that lots of times!

What is your reason for or your WHY you want to start or keep doing Menue planning?

Stencils and Watercolor A MATCH MADE IN HEAVEN!


I love when two crafty tools come together and you can get some really great cards! I made both of the stencils, the triangle one and the mermaid scales stencil using my Silhouette, I cut out a back ground file to use as a stencil on brown craft paper that you get at your box craft store.  This card is easy and you can make a ton of these cards, ahem.... (Christmas) 


Materials
Watercolor panel cut to 4.25x5.5
Watercolor: two color friendly colors, like teal and purple
Medium flat brush
Container of water to watercolor
Stencils (I chose a triangle and a fish scales)
White cardstock for die-cuts
Flower die cut (2 medium and 1 small flower) for celebrating card, Star fish from Silhouette Design Store
3 Gems for the middle of the flower
A2 Card base


Start by adding a two toned flat wash to the card, making sure that the two colors blend well in the middle. Let it dry, or use a heat tool to dry it quicker


Place stencil onto the card base, tape it down so it doesn’t move with some painter's tape or artist’s tape. Add the stencil image onto the card by using the same color you used for your background, use the purple on purple, blue on blue. Get some pigment onto a sponge that is a bit damp, (you don’t need to much water. I like using a spray bottle to get the sponge and the pigment wet just wet enough to pick up the pigment and stencil it on. The pigment should be fairly thick, like a creamy consistency). Making sure that in the middle blends well together. Let it dry.


Add the die cuts, I used two small flowers and a medium flower from the die cut set. Then add them to the card as if they were growing on the stenciled flowers.

Adhere the card panel to the card base.

Learn more about how to use watercolor in these classes I love them both!

How to learn more If you are like me and always love to learn more about watercolor cards there are two classes that I recommend you take:
Angela Fehr's Creative Watercolor class: This is a great class for anyone that wants to add watercolor to cards, art journaling, and Calligraphers.  This link will get you 20% off the class I am in the works of making a review for this class, I highly recommend this class, it is a great class! Here is the link for the review of this class


Watercolor Card's Made Simple on Craftsy. This is the perfect class for all paper crafters you can see my class review here

Happy Creating!


I use Affiliated links to help support my blog.

Living a better Creative life as a CreativeBug


Inspired by an Art Jornal class from CB
I really enjoy the summer with the kids home, I love the laughter that they bring to me in the afternoon when my living room is a mess with their new creation of a zoo, or a city, or a habitat for their pretend animals, or when our living room transforms into a vet clinic. It's a magical place to be if you are a kid!

Autograph Art Journal inspired by CB!
I love seeing all the fun things my kids can come up with, I love seeing them paint something and think that they are awesome! I am not feeling that these days I paint something and I think well, good thing that wasn't a masterpiece in the making, this will never see the light of day as long as I am alive.  So how do we become more creative? Besides the obvious reasons like the Just Do It phrase  CreativeBug may be a great answer, Right now CreativeBug is doing a monthly challenge to help you become more creative! ready to join me?


Day one 
Courtney said that it's not about what the drawing (art) is, it's about establishing a habit!
Paper Peony class from CreativeBug
What great advice! The activity was Blind Contour drawing which is super fun, I can't wait to do this with my kids!

Day two: Observing! She recommends doing a color swatch book, each day you have a color of the day that you love, and then you name that color, so like today I would Choose a teal green, and name it tall grass because on my morning walk we saw tall grass, it was beautiful! Courtney says to become more creative you should observe more (be in the present) and write down 6 things you saw today that jumped out at you, and 6 things you did, and something you overheard or read that jumped out at you. I am so excited to start this 6x3 observing challenge!

I can't wait to see what the other days will be like, I think August is one of the hardest months to be creative, personally, this is a great time to enjoy creativity, and let it flow like it should!

Paper Rose class from CreativeBug
Creativity is in all of us, the kids, the mother, the grandmother, the Lawyer, the Doctor, the accountant, we are all made to be creative! I am so glad that my amazing Husband found CreativeBug for me and bought CreativeBug for me as a "stocking Stuffer" I have really enjoyed this for the past 6 months!


Things you may not have known about CreativeBug that makes me happy:

It's subscription based (like Netflix) for less than $5 a month (totally worth your sanity!)


You get one class credit every month that is yours forever, just log in even if you don't have a subscription, or let your subscription expire! I have gotten all the Yao Cheng Classes for future reference!

All over floral pattern from
Yao Cheng Watercolor class

They donate %5 to Art Education! WOW!

The instructors sometimes will critique and comment on work, I personally have had Yao Cheng comment on one of my questions/concern I had when starting out with watercolor. It made me feel like I was able to connect with the instructor on a more personal level.
Geometric Pattern inspired by Yao Cheng watercolorist

LISA CONGDON is amazing! I love that she is on Creativebug!

I came to the conclusion that CreativBug is a great resource for family art activity time and kid art time!

Lots of great Ideas with the kids and art! We did Bubble painting and the kids loved it, Thanks, CreativeBug!

I would love to know what you are excited to learn with CreativeBug, leave a comment and Follow me on CreativeBug!

Get your first month of Creativebug for just $1, then save 30% at Jo-Ann

~I use affiliate links to support my blog~

Scribble a Summer Background Card!

Materials
Watercolor paper cut to 4.25x5.5
Repositionable adhesive
Craft matt
Scribble sticks (I LOVE THEM, shh.... better than any water soluble crayon aka distress crayons)
Spray bottle with water
Cup of water for watercolor
Tim Holtz flower stencil
Tim Holtz Grid Dot layering stencil
Clear or white embossing ink (I used VersaMark)
White embossing powder
Baby wipes
Mounting tape, or foam tape
A2 card base.
Medium round brush, I like a mop brush for this, but any medium round brush will work.


Start by adding just an inch of repositionable adhesive to the back of the watercolor paper, stick this to the craft mat This helps you not get extra finger prints on the card panel.


Add your pigment to the card, I used the green, blue and yellow and orange tones for a summer day feel. Scribble onto your panel in a horizontal fashion making sure you overlap the colors for a blending effect. Once you are happy with the colors, spray lightly over your paper and use your wet brush to move the colors to the way you like it.


Dry the panel with a heat tool, don’t get it too close, the scribble sticks don’t like the heat too close and it will bubble up. At this time if you need to take the paper off of the mat that is all right.


Once dry take the flower stencil and stencil the card with VersaMark ink or embossing ink, remove the stencil, and cover the inked surface with the white embossing powder. Heat set the white embossing powder.


Then with the square pattern stencil take a baby wipe and take away some of the pigment, don’t scrub too hard, gently go over parts of the stencil, I like to use my index finger with a light touch and go into the spots that I want the pigment to be removed. The point of this is to add texture, not to have the whole stencil showing.

Add your die cut, and mount the panel on an A2 card base.


How to learn more If you are like me and always love to learn more about watercolor cards there are two classes that I recommend you take:
Angela Fehr's Creative Watercolor class: This is a great class for anyone that wants to add watercolor to cards, art journaling, and Calligraphers.  This link will get you 20% off the class I am in the works of making a review for this class, I highly recommend this class, it is a great class! Here is the review for the class


Watercolor Card's Made Simple on Craftsy. This is the perfect class for all paper crafters you can see my class review here

Happy Creating!


I use Affiliated links to help support my blog.

Trending NOW: Stamped Floral Watercolor Card


After doing this card for World Watercolor month and For Memory Bounds Make and take, I had to buy like 5 more different brush stroke stamps from Penny Black! I am a Huge fan!


the card was used in Memory Bound July Make-n-Take


Materials:
Tim Holtz Worn Lipstick and Peeled Paint ink pads
Spray bottle with water
Container of water for watercolor
Watercolor paper cut to 4.25x5.5
Small round brush (I like sizes 4-6)
Medium-large round brush (I used a size 12)
Craft mat for ink
Mounting tape, or foam tape
A2 card base.


Start by adding some of the peeled paint to the craft mat, spritz it with water.
Get your paper and stamp situated on the MISTI, I chose the flower to be the right center.


With your medium to large brush make a gradient wash on the water color paper with the peeled paint ink Your work/paint surfaces on the craft mat, not on the MISTI


Once your gradient wash is looking sheen, (semi glossy, but not super wet) ink the stamp, start at the top and work your way down, I used Worn Lipstick for the flower and peeled paint for the steam.


Make sure that your gradient wash is dark value at the bottom so the pink stands out more at the top!


Stamp the flower onto the semi glossy sheen watercolor paper, (you want the ink to bleed) That is how you get the watercolor look. Troubleshooting: If the ink didn’t bleed like you wanted it too: ink the flower again but this time spritz the stamp with a bit of water. The paper was too dry by the time you stamped it.


Play with the stamped flower, at this time you can add some darker tones to the flower, I used a small round brush and painted with worn lipstick ink onto some of the pedals that I thought could use some extra value, (don’t go overboard with this, spend less than a minute on this. The more you play the more unnatural it will look) On the flip side doing this adds depth to the flower.


Dry the paper, you want it to be bone dry (as dry as it can be.) I use a heat tool for this to speed up the process.


Now it’s time to ink the flower again in the same way before, pink for the flower, green for the steam. This helps give you more details for the flower. This is also a great time to stamp a sentiment if needed.

Do the stamping 2 more times where ever you want the flowers to be.

If needed at a sentiment stamp or die cut to the card and you are done!

I am entering this card in to the Penny Black Saturday Challenge Blog and at this Blog post from the Card Concept, as a clean and graphic style. 

To find out other great ideas on how to use water-soluble inks to use as watercolor check out 


How to learn more If you are like me and always love to learn more about watercolor cards there are two classes that I recommend you take:
Angela Fehr's Creative Watercolor class: This is a great class for anyone that wants to add watercolor to cards, art journaling, and Calligraphers.  This link will get you 20% off the class I am in the works of making a review for this class, I highly recommend this class, it is a great class! Here is the Class Review post


Watercolor Card's Made Simple on Craftsy. This is the perfect class for all paper crafters you can see my class review here

Happy Creating!


I use Affiliated links to help support my blog.

What is Strategic Shopping and why you should be doing it!

Want to go grocery shopping? Yup, me neither. You go, get your essentials without a list, and $200 later you come home with everything but what you went in to get in the first place. We have all been there. So.. there has got to be a better way right? Yes, and companies know it, that’s why there are all these little tricks to help you save your money at THE STORE!


To beat the marketing game as consumers we need to play along and take small victories when they come. This game is called Strategic Shopping, it’s a real thing, grocery stores and supermarkets (WalMart in particular) knows it really well.  Here are some tips to help you save money next time you're at the grocery store


Know your Store’s add and buy what’s on sale. Lots of times Hy-Vee and other grocery stores have a weekly sales ad. Hy-Vee in the Des Moines area the add drops on Tuesday, I like to grocery shop on Monday and/or Thursday. To be more particular, Hy-Vee has the best items on sale at the beginning of the month, and then at the end, the middle part of the month they usually are not filled with great rock bottom prices. Keep an eye on those “hot deals” sometimes the only reason why they are a “hot deal” is because they have a bunch of that product that they need to sale, it’s not really a discount.


Shop with a list but be flexible, I am a total advocate for sticking to a list, but often times I go grocery shopping and deviate from my list slightly, let me give you a great example: I see this pork loin on sale for half the cost it normally is (in Iowa we can get pork at a good price,) it’s not on my list but that’s a better deal than the pork chops I was going to get. So I get the pork loin and cut them into chops, better yet I make the meat department cut up the loin for me so I don’t have too. Sometimes a general item of 2lbs of white meat than 2 lbs of boneless chicken breasts can save you loads of money. So always be on the lookout for deals that are
worth buying, and that you can substitute.


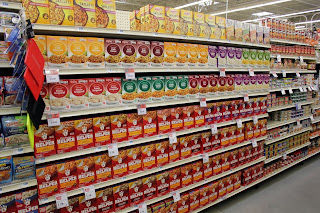
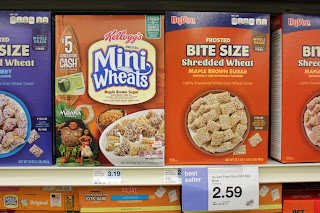
Look High look low… all too often the manufacturers will pay the grocery store for prime real estate for their product placement, usually at eye level. Cereal is a great example, all the popular more expensive items are in plain sight, where the same item but in store brand is at the bottom. (often times the store brand is made by the same manufacturer.) So I ask myself am I really willing to pay X brand name for prime real estate when I could get the same product for at least 10% cheaper?


Same product, different locations I love tortillas for easy dinner solutions, which one do I buy?There are only like 40 different kinds, the answer is NOT THE ONES THAT ARE REFRIGERATED. You are paying for the cost of them to refrigerate them… go with the ones that are just on the shelf, the same thing with bagels. While we are on locations, know where your deals are kept, for us Hy-Vee Prairie Trail always has baskets at the front with discounted items, sometimes it’s laundry detergent at a rock bottom price, but I have been able to get a bunch of staples like brand name cereal, and artisan noodles at a rock bottom price.


Same product but Different packaging is always a great game changer, I am always wondering why they had to change the packaging up, My mommy saving senses are in active mode: sometimes it’s a way for you to get less and pay more like a standard cake mix, they lower the price 10 cents, but you get half the cake mix! Yes, really manufacturers will do that and call it a new item. I get annoyed by this often.I get a different brand and off I go.

Another great example was when I was looking for Multigrain Tortilla Chips, guess what? All tortilla chips are multi grain because they use corn, corn is a grain. So don’t pay extra for those “healthy” multigrain chips, when I saw that the ingredients were the same, same size, “healthy marketed bag” was $2.00 more! OUCH!!!! Pay attention to the details, and what you are really buying.

Just doing these small things have saved me on average $20 every grocery store visit, Or in a better light, that is how I can spend $20 extra at Memory Bound, or on other art supplies! Hah it's always fun when I feel like can save $20 and spend it on my art addiction!
Related Posts Plugin for WordPress, Blogger...